Table of Contents
- Introduction to Handstand – Adho Mukha Vrksasana
- Step-by-Step Guide to Handstand – Adho Mukha Vrksasana
- Key Alignment and Drishti Points
- Benefits of Handstand – Adho Mukha Vrksasana
- Muscles and Systems Activated
- Preparatory and Counter Poses
- Common Mistakes and How to Avoid Them
- Modifications and Variations
- Contraindications and Safety Guidelines
- Handstand in Yoga Philosophy and Daily Practice
- Final Thoughts
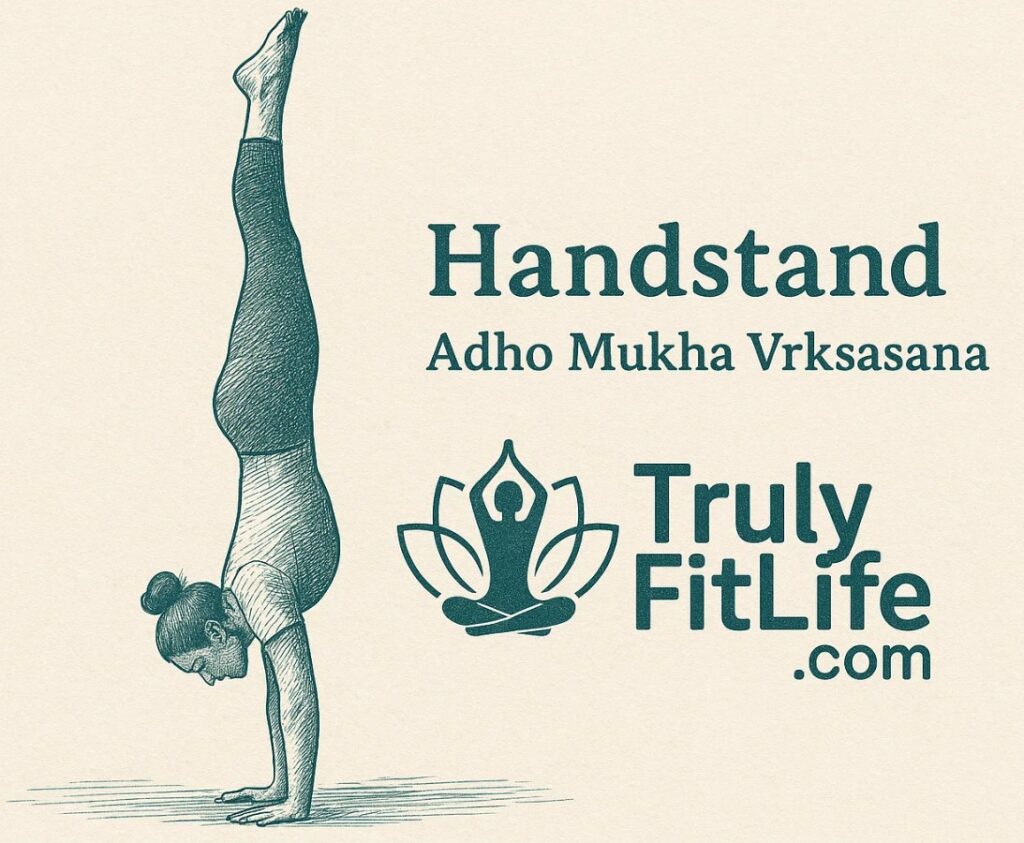
1. Introduction to Handstand – Adho Mukha Vrksasana
Handstand – Adho Mukha Vrksasana (pronounced AH-doh MOO-kah VRIX-ah-sah-nah) is one of the most iconic yoga inversions. In Sanskrit, Adho Mukha means “facing downward,” Vrksa means “tree,” and Asana means “pose.” Thus, the posture is often translated as the Downward-Facing Tree Pose, symbolizing stability, rootedness, and upside-down awareness.
This pose demands strength, balance, concentration, and courage, making it a hallmark of advanced yoga practice. Beyond physical fitness, Handstand teaches practitioners to embrace challenges, overcome fear, and cultivate mental stillness while inverted.
2. Step-by-Step Guide to Handstand – Adho Mukha Vrksasana
To perform Handstand – Adho Mukha Vrksasana safely, follow these steps:
- Start in Downward-Facing Dog (Adho Mukha Svanasana): Place palms firmly on the mat, shoulder-width apart, and spread fingers wide.
- Step forward: Walk feet closer to the hands to shorten the distance.
- Kick up gently: Shift weight into the palms, lift one leg high, and lightly kick the other off the ground. Use a wall if needed.
- Engage core and shoulders: Draw the belly in, push the floor away, and stack hips above shoulders.
- Straighten legs upward: Once balanced, extend both legs toward the ceiling like the trunk of a tree.
- Focus gaze (Drishti): Keep eyes slightly forward between hands, not at the floor.
- Hold steady breathing: Stay inverted for 5–20 seconds, gradually increasing with practice.
- Exit mindfully: Lower one leg at a time back to the mat and rest in Child’s Pose (Balasana).
3. Key Alignment and Drishti Points
- Palms rooted firmly, index fingers pressing into the mat.
- Shoulders stacked above wrists, not collapsing inward.
- Core engaged to stabilize pelvis and lower back.
- Legs active, reaching upward with pointed or flexed feet.
- Drishti at the ground between hands to maintain balance.
4. Benefits of Handstand – Adho Mukha Vrksasana
Practicing this pose offers profound physical and mental rewards:
Physical Benefits
- Strengthens shoulders, arms, and wrists.
- Engages core muscles for stability.
- Improves blood circulation and energizes the brain.
- Enhances balance and proprioception.
- Increases lung capacity through deeper breathing.
Mental & Emotional Benefits
- Builds confidence and courage.
- Sharpens focus and concentration.
- Reduces fear and hesitation by encouraging trust in the body.
- Cultivates resilience and patience in practice.
5. Muscles and Systems Activated
Handstand – Adho Mukha Vrksasana primarily works:
- Upper Body: Deltoids, triceps, trapezius, latissimus dorsi.
- Core: Rectus abdominis, obliques, transverse abdominis.
- Lower Body: Glutes, quadriceps, hamstrings (engaged for stability).
It also stimulates the nervous system, increases oxygen flow to the brain, and strengthens the cardiovascular system by challenging circulation.
6. Preparatory and Counter Poses
Preparatory Poses
- Dolphin Pose (Ardha Pincha Mayurasana)
- Forearm Plank
- Downward-Facing Dog (Adho Mukha Svanasana)
- Standing Forward Fold (Uttanasana)
Counter Poses
- Child’s Pose (Balasana)
- Staff Pose (Dandasana)
- Seated Forward Bend (Paschimottanasana)
7. Common Mistakes and How to Avoid Them
- Collapsing shoulders: Keep pressing into the mat to engage shoulder girdle.
- Overarching lower back: Engage core to maintain alignment.
- Kicking too hard: Use gentle controlled kicks to avoid injury.
- Holding breath: Maintain steady inhalations and exhalations.
8. Modifications and Variations
- Wall Support: Practice against a wall to gain confidence.
- Half Handstand: Keep one leg on the ground, extend the other upward.
- Scissor Legs Handstand: Alternate legs mid-air to build control.
- Press Handstand: Lift legs slowly without kicking, for advanced practice.
9. Contraindications and Safety Guidelines
Avoid Handstand – Adho Mukha Vrksasana if you have:
- High blood pressure
- Glaucoma or serious eye conditions
- Wrist or shoulder injuries
- Pregnancy (unless guided by an expert)
Safety Tips:
- Always warm up shoulders, wrists, and hamstrings.
- Practice on a stable yoga mat, near a wall.
- Beginners should attempt under supervision.
10. Handstand in Yoga Philosophy and Daily Practice
In yogic philosophy, inversions symbolize changing perspective—viewing the world upside-down teaches humility, awareness, and adaptability. The Handstand represents grounding through hands (instead of feet), reminding practitioners that strength comes from both rooting down and reaching up.
Regular practice of Handstand – Adho Mukha Vrksasana develops courage and focus, qualities that extend beyond the mat into daily life.
11. Final Thoughts
Handstand – Adho Mukha Vrksasana is more than just an advanced yoga inversion—it is a transformative posture that cultivates strength, balance, and inner courage. With consistent practice, patience, and proper technique, anyone can progress toward mastering this empowering pose.