Table of Contents
- Introduction to Parighasana – Gate Pose
- Step-by-Step Guide to Practice Parighasana – Gate Pose
- Benefits of Parighasana – Gate Pose
- Physical Benefits
- Mental & Emotional Benefits
- Spiritual Benefits
- Anatomy and Muscles Engaged in Parighasana – Gate Pose
- Contraindications & Safety Tips
- Variations and Modifications of Parighasana – Gate Pose
- Preparatory and Counter Poses
- Parighasana – Gate Pose in Yoga Philosophy
- Common Mistakes to Avoid in Parighasana – Gate Pose
- Final Thoughts
Introduction to Parighasana – Gate Pose
Parighasana – Gate Pose is a traditional yoga posture that combines a lateral side bend with grounding through the legs. The Sanskrit word Parigha means “gate latch,” symbolizing a firm structure that provides stability while allowing openness. Practicing this pose enhances flexibility in the spine, stretches the intercostal muscles, and improves balance.
Parighasana is often included in Hatha and Vinyasa sequences, making it suitable for practitioners of different levels. This posture prepares the body for deeper side bends and helps open the chest and lungs, supporting better breathing.
Step-by-Step Guide to Practice Parighasana – Gate Pose
Follow these steps carefully to perform Parighasana – Gate Pose safely and effectively:
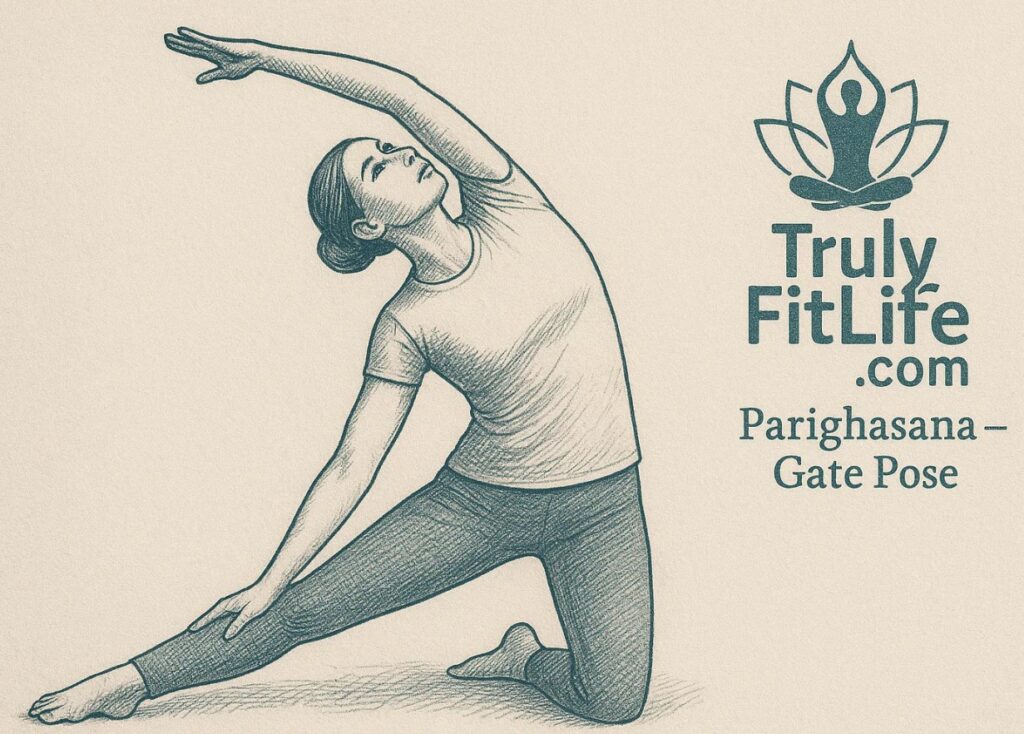
- Begin in a kneeling position with your torso upright.
- Extend your right leg out to the side, keeping the toes facing forward or slightly angled outward.
- Ensure your left knee is directly under the hip and firmly grounded on the mat.
- Inhale and raise both arms to shoulder level, parallel to the ground.
- Exhale as you extend your right arm down towards the right leg, placing the hand on the shin, ankle, or floor.
- Stretch your left arm overhead, creating a long line from the hip to the fingertips.
- Gaze gently upward toward the raised arm (Drishti at the palm).
- Hold the posture for 20–40 seconds, breathing deeply.
- Slowly return to the kneeling position and repeat on the opposite side.
👉 Tip: Keep your core engaged to avoid collapsing into the side bend.
Benefits of Parighasana – Gate Pose
Physical Benefits
- Stretches hamstrings, inner thighs, obliques, and intercostal muscles.
- Improves spinal flexibility and mobility.
- Enhances balance and coordination.
- Stimulates digestion by massaging abdominal organs.
- Expands lung capacity, supporting respiratory health.
Mental & Emotional Benefits
- Reduces stress by activating the parasympathetic nervous system.
- Promotes mindfulness and focus through steady breathing.
- Creates a sense of openness and release in the chest.
Spiritual Benefits
- Encourages prana (life force) flow through the torso and heart center.
- Activates the Anahata (Heart Chakra) and Manipura (Solar Plexus Chakra), enhancing emotional balance.
Anatomy and Muscles Engaged in Parighasana – Gate Pose
Parighasana primarily works on:
- Obliques & Intercostal muscles (side body stretch)
- Quadriceps & Hamstrings (leg engagement)
- Spinal extensors (maintaining upright posture)
- Shoulders & arms (lengthening overhead reach)
This makes it a powerful full-body stretch that improves strength and stability while encouraging spinal health.
Contraindications & Safety Tips
Avoid or modify Parighasana if you have:
- Knee injuries (use padding under the grounded knee)
- Chronic lower back pain without medical guidance
- Shoulder stiffness (keep the top hand on the waist instead of overhead)
Safety Tips:
- Do not overstretch the side body; move within your comfort range.
- Keep the supporting knee firmly grounded to avoid imbalance.
- Focus on alignment rather than depth of the bend.
Variations and Modifications of Parighasana – Gate Pose
- Beginner Variation: Keep the top hand on your hip instead of reaching overhead.
- Advanced Variation: Place the lower hand on the floor outside the extended leg for a deeper stretch.
- Chair Variation: Perform the side bend seated on a chair for support (ideal for office yoga or seniors).
Preparatory and Counter Poses
Preparatory Poses:
- Tadasana (Mountain Pose)
- Trikonasana (Triangle Pose)
- Upavistha Konasana (Seated Wide-Angle Forward Bend)
Counter Poses:
- Balasana (Child’s Pose)
- Bhujangasana (Cobra Pose)
- Sukhasana (Easy Pose with Side Stretch)
Parighasana – Gate Pose in Yoga Philosophy
In yoga philosophy, Parighasana symbolizes the idea of “opening the gates” to new energy, awareness, and breath expansion. The posture embodies balance between stability and flexibility, reminding practitioners to remain grounded while expanding their consciousness.
This asana is also linked with the pranic expansion of the side body, enabling practitioners to harness energy flow and increase vitality.
Common Mistakes to Avoid in Parighasana – Gate Pose
- Collapsing the chest instead of opening it sideways.
- Allowing the grounded knee to drift outward.
- Holding the breath during the pose.
- Overstretching the lower hand and compromising spinal alignment.
Final Thoughts
Parighasana – Gate Pose is more than just a side bend—it is a gateway to strength, openness, and balance. Regular practice builds flexibility, enhances lung capacity, and deepens mindfulness. Whether you are a beginner or an advanced yogi, integrating this pose into your practice can bring physical, emotional, and spiritual harmony.
🧘 Related Yoga Poses You May Like
- ➤ Utthita Parshvakonasana – Extended Side Angle Pose Complete Guide
- ➤ Ardha Chandrasana – Half Moon Pose for Balance and Energy
- ➤ Parivrtta Trikonasana – Revolved Triangle Pose Complete Guide
- ➤ Side Bending Mountain Pose (Parshva Tadasana) – Boost Flexibility & Balance
- ➤ Tadasana Urdhva Baddha Hastasana (Mountain Pose with Bound Arms Overhead) – Steps, Benefits, and More
- ➤ Virabhadrasana II – Warrior Pose II for Strength and Stability


